Sparkler Photo Tips for Amazing Wedding Images!
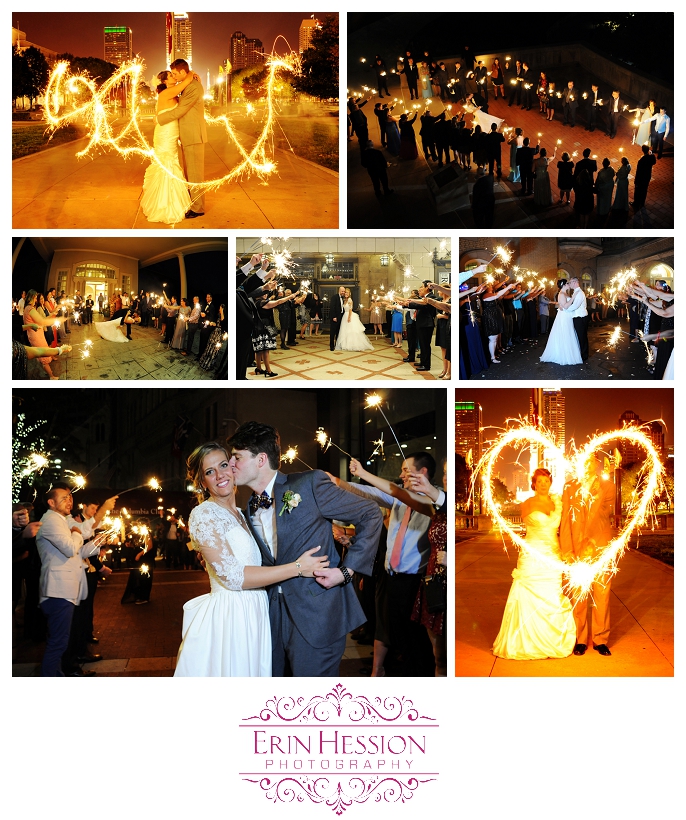
Wedding season will be here before we know it so I thought I’d offer up some fun ideas and advice on how you can incorporate sparklers into your wedding to create some amazing images! Over the past several years, we’ve been bringing sparklers with us to most of our weddings and the resulting images have definitely turned out to be some of our favorites. We’ve photographed everything from sparkler exits to couples who have gotten their wedding party involved to spell out words like, “love” or their wedding date, to create a truly memorable image!
4 tips on how you and your photographer can get great photos with sparklers:
- Buy 3 minute sparklers and a wind resistant lighter ahead of time (They do make 5 minute sparklers but I’ve found that those create too much smoke)
- Check the sunset time for your wedding date
- Use a camera on a tripod with a wide angle lens
- Settings: Low ISO, long shutter speed, white balance on “shade” if you like a warmer toned look
We purchase the 3 minute sparklers from Sparklers Online and then bring them with us to most events now. You’ll want to check the sunset time online beforehand and look for the “end civil twilight” time which tells you at what point it’ll be totally dark outside and then plan to do them at that time or even later depending on the weather and the order of events. Once it’s dark outside, we take our couples out to the venue’s parking lot or open area (away from grass or anything that can catch on fire) and we teach them how to get the best sparkler photos before we actually light them. We always make sure that one of us has a bottle of water handy in case anything goes wrong and we always choose the darkest spot available in the nearby area to avoid ambient light showing up in the photos. (Sometimes a dark background isn’t possible in which case you’ll have to play with the exposures a bit more)
To get the best heart sparkler shots, the couple will need to stand as still as possible and remember to smile while they’re doing their sparkler action in 1 second or less. It’s much harder than it looks! Practice making each half of the heart by starting at the top and curving around to the bottom together. You’ll want to start and end at the same time so make sure you practice before the photographer hands you a lit sparkler.
There’s all kinds of fun things you can do with sparklers, there’s a shot going around on Pinterest where the couple is surrounded by sparklers and that’s become a very popular request. When we have a client who requests that shot, we usually take 2 groomsmen outside with us and have them run around the couple while the sparklers are lit, we advise them to go up and down with the sparklers while running but we ask that they try to avoid the sparklers being in front of the couple’s faces while they’re doing it. (Photographers, the settings for this particular photo are usually ISO 200, f/6.3 at 2.5-7 seconds – depending on ambient light, no flash & on the “shade” white balance setting.) I think sparklers make really neat end of night shots for our client’s albums and everyone loves the outcome of the photos!
Notes to your photographer: before going outside, put a wide angle lens on your camera (we usually use a 24mm) and then put your camera on a tripod and preset your camera settings beforehand. It’s much easier to do all of this preparation work while you’re still inside the venue than it is when you’re outside in the dark. The settings are a little bit of trial and error depending on the amount of side light or back light you may be working with in the evening. We tend to switch the white balance to “shade” since that adds more warmth to the photos, it’s a personal preference. Also, during sparkler exits, we usually incorporate a bit of flash or an off camera video light to capture the most ambient back light while still maintaining good exposure on their faces. 🙂
Comments
Sorry, the comment form is closed at this time.